In previous posts, I already explained a lot about how a motherboard works. But the last step is to install a motherboard in a workstation.
This is handy to know in case you want to build your own workstation but this knowledge is also very useful in case your motherboard breaks down and needs to be replaced. Installing a motherboard can be a challenge if you have never installed a motherboard before. It requires precision, patience, and structure.
In this post, I’ll show how to replace an old motherboard/install a new motherboard into a workstation. I will also give you some basic troubleshooting tips in case your motherboard fails.
Motherboard and Case
The first thing you have to know is the type of motherboard that you want. This is based on the CPU you have (in case of replacement) or the one that you want to buy (in case of building a new workstation). In most cases (99,9%) you have or want an AMD or an Intel processor. After you have defined the CPU you need to check the form factor (micro ATX or full-sized ATX). The type of form factor defines the case you need: it needs to fit the case of your workstation. You can get more info about form factors in this post. Shortly summarized: you need a case (your current case or a new case) that fits the motherboard you want to buy. If the motherboard has a different form factor than the one that is suitable for your case, you will not be able to install it: it won’t fit. The final thing you want to check is the features of the motherboard that you want to buy and how hard it will be to configure. Read the motherboard manual of the one you want in order to find this out. One of the more important features is the RAM that is compatible with the motherboard. If your old motherboard is using DDR3 RAM and you want to buy a motherboard that uses DDR4 RAM, you also need to upgrade your memory because DDR3 RAM will then not fit. So check out the features very closely and check if the parts you currently have (and that you want to keep) fit on the new motherboard. There are some very good motherboard manufacturers (ASUS, BIOSTAR, GIGABYTE, MSI, and Intel) out there so check for reviews if the motherboard you want has a good review. Golden rule: if a supplier doesn’t have a good return policy and not a good warranty, don’t buy it. Once the motherboard arrives, make sure it includes a motherboard book. All motherboards should have this book. If not, check for it on the manufacturer’s Web site and in case it is not there, check directly with the manufacturer.
When you want to build a new workstation, you finally have to select the case that you want. This should be a case that matches your space needs, your budget, and the form factor (do a quick test-fit before you buy the motherboard to prevent a trip to the seller of the motherboard). There are tons of cases out there and they differ in quality. High-quality cases will (most of the time) give you an easier time with installing by offering free component installation. This means you don’t have to screw down cards and/or drives: you can just snap them into place. However, you always have to attach the motherboard with a screwdriver to secure it. There is not an installation that is completely tool-free as of yet. Also, check if the power supply unit (PSU) that you have (or want to buy) has sufficient wattage to manage your system. An underpowered system will end up in sudden error screens.

CPU and external expansion cards (mainly Graphics Processing Units) are the biggest power eaters so do your math by adding up the watt usage of the biggest power eaters and making sure it matches your power supply unit’s power. Always use a safety margin for this.
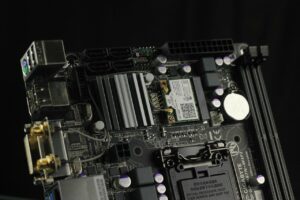
Installing a Motherboard
In case you want to replace a motherboard, you need to remove your old motherboard first. This is done by removing all the cards on your motherboard and unplugging all cables attached to the motherboard. Make sure to do this in a very structured way: return screws back to their mounting holes to prevent losing the screws until you are going to reinstall the parts.
After everything is removed, you can unscrew the motherboard. A motherboard is connected to the case with small connectors that are called “standoffs”.

Before you completely attach the motherboard to the case, it is wise to pre-install the critical components, like the CPU, CPU fan, and RAM into the motherboard. When attached, you only have the case as moving space and especially if you use a small case this might give you a way harder time attaching all components compared to doing this before you attach the motherboard. In addition to that, pushing in components might result in “flexing” your motherboard which means it can bend. Bending can lead to damaging your motherboard and you don’t want that. Installing CPU fans on a motherboard that is already attached can be a very annoying experience as well. It’s better to do that on a tabletop. Nowadays, a lot of CPU fan suppliers are mounted on brackets on the bottom of the motherboard as well. This requires installation before placement in a case anyway. Make sure to check that the CPU and RAM are compatible with the motherboard and with each other (RAM speed that is not compatible with your CPU will end up in an unstable system). After your pre-installation is done, you can install the motherboard to the case by securing it with the appropriate screws.
After this is done, insert all power connections and test them. A POST card (you can get them for about € 15) can be very helpful when you test the system because you don’t have to add the speaker, video card, monitor, and keyboard to verify if the system is able to boot. POST stands for Power-On Self Test and relies on your CPU, BIOS, and I/O interface. If they all work as intended, the POST card shows you that the POST takes place and that the booting of the system will work as intended. In other words: your basic components are installed properly. Of course, you can also test by just booting up the system instead of checking if it all works with a POST card.

The next part is to connect all the cables for the LEDs, buttons, and front-mounted ports on the front of the box. As with the key components, it is easier to do this before you install the motherboard fully in the case. Usually, it concerns parts like the soft power button, the reset button, speakers, hard drive activity light, power light, USB, sound, and Thunderbolt. All these wires have specific pin connections on the motherboard.
When you install all those wires (sometimes it can be confusing), know that the lights are LEDs and not light bulbs. This means they have a positive side and a negative side. If they don’t work, turn the connector around and check if they work after that. In case of doubt: guess. You are not going to destroy a computer by incorrectly attaching wires. It will only result in a device not working. Always use the motherboard book for the correct installation or in case of any doubt. Finally, know that (except for the soft power switch on an ATX system) you don’t need any of these wires for a computer to run. Most of the time the function of each wire is printed on the connector as well. If this is not the case, you can track each wire to the LED or to the switch to check its function.
Motherboard Troubleshooting Tips
Motherboards can fail throughout time because of age or because of a defect. There are 3 troubleshooting categories when a motherboard fails.
Catastrophic failure
When this happens, your workstation will not boot anymore. When you are on your workstation and a catastrophic motherboard failure happens, you will hear a loud noise that is followed by a completely dead computer. First, check the power and hard drive activity indicator lights on your workstation for activity. When they are not working anymore you will have a power supply failure or a motherboard failure on your hands. When you have a brand new motherboard, there is a big chance that the reason for a breakdown is a “burn-in failure”. Burn-in failures occur in the first 30 days of use most of the time and are driven by incorrectly formulated capacitors on the motherboard. A capacitor is a device that stores and releases energy (electricity). They look like small batteries. When a capacitor is “swollen” it is a big hint that you have a burn-in failure.

In case of a burn-in, don’t try to replace a capacitor. Simply replace the motherboard. This is the reason why you should only buy from a reliable motherboard supplier at a reliable dealer. The reason for this is the fact that they will replace it without additional costs if it is within the guarantee period.
Component replacement
To do this, you have to check all hardware components if they are working as intended. This investigation process of trial and error can be very time-consuming. Document your investigation process closely when going through this process. Taking notes on individual components you tested will make future efforts more efficient because you can follow the same procedure you wrote down and the checks you made by doing them. Once you have found the bad actor, replace the component and start up your system. If you still have the same issues, continue with the process of analyzing all remaining hardware components.
Full component analysis is mostly used by techs or by people that like to tinker with computers as a hobby. For all other people, it is far more suitable to bring the computer to a computer repair shop that is used in dealing with these issues. This is far more efficient and less time-consuming.
Inexplicable failure
This kind of failure is the most annoying one you will get. It is a failure of which you have no physical clue of what happened. All components seem to be in order (no component failure of what you can think of after your analysis) and your investigation process is ended without a solution. Very annoying! But don’t get angry: this can happen and you should be proud of your persistence and the analysis you have done. It is never a waste. An investigation process always gives you more insight and during the process, you learn a lot about your computer. However, when nothing seems to work you have three options.
The first option is flashing your BIOS. This is a “hail Mary” so there is only a small chance that this works. You can read more about BIOS in this post if you like to know more about how a BIOS works. Flashing your BIOS stands for updating your firmware/your BIOS. Go to the website of your motherboard manufacturer, get the latest firmware version and update your BIOS.
The second option is also a leap of faith: buy a new motherboard and replace the old one. This is risky because you might have overlooked something during your investigation process. However, if your motherboard is still within warranty it is worth a try. Otherwise, I would opt for option three.
Option three is bringing the computer to a computer repair shop that is used in dealing with these issues. I can understand the frustration when it comes to this. I myself would have a hard time doing this as well. It hits your pride and can lead to a lot of frustration because it seems you “lost” and wasted all the time that you invested in trying to fix it yourself. Try to leave your pride behind (easier said than done) and use your rational mindset instead of your emotional one. Another option is to ask a colleague (in case you are working as a computer technician) or invite a friend that is a computer technician or is a computer tinkerer: maybe the two of you can fix it together.
Final Thoughts
I hope this guide gives you the support that you require in order to install or replace a motherboard or troubleshoot a motherboard in case of issues.
Feel free to contact me if you have any questions or if you have any additional advice/tips about this subject. If you want to keep in the loop if I upload a new post, don’t forget to subscribe to receive a notification by email.