
In a previous post, I talked about my ignorance of the footprints I make while surfing the internet. These footprints can be wiped but there are also tools in your browser that can add some extra protection as well while browsing.
These tools are called plugins and it’s really easy to add them to your browser. In this post, I will discuss my favorite 5 plugins to protect my privacy.
Adding plugins to your browser
I will focus on Google Chrome, for now, relating to plugins. To access plugins you first go to the settings and after that, you click on “extensions”:

This leads you to the panel that manages your extensions. you can enable and disable the plugins and you can also add plugins if you want. Adding plugins is done by clicking on the ” Extensions” button on the left in the Extension panel and selecting “Chrome Web Store” after that (it’s completely on the bottom of the menu: just contact me if you can’t find it).
After clicking you will notice that you are in the Chrome Web Store. By typing (a part of) the plugin, you can just click on the extension. I use HTTPS Everywhere as an example:

After that, you can click on “Add to Chrome” and the plugin is being installed. If you go back to your extensions dashboard, the plugin is installed.
After installing the plugins, you can see all kinds of data from the plugins and adjust setups of these plugins by clicking on the puzzle piece on the right top of your browser:

So far the basics of installing a plugin for Chrome. Now let’s move to the plugins I recommend to improve your privacy while browsing.
HTTPS Everywhere
Let’s start with the example I used for installing plugins. This plugin improves your online security by protecting you against, for instance, content injection. Content injection refers to an attack by cybercriminals in which they use the vulnerability of a web browser to install crimeware on a user’s computer. You also get a boost of extra privacy by using this plugin. The reason for this is that traffic that is handled over HTTPS is all encrypted (HTTP isn’t). This prevents attackers from intercepting your traffic: the traffic they intercept is useless because they won’t be able to decrypt the content.
DuckDuckGo Privacy Essentials
This is an anti-tracking plugin for Chrome. In addition to this, it also defaults your connections to HTTPS when this is possible and it also provides you a summary of the privacy practices of a website when they are publicly available. You can also get a rating when you are on a site. You can do that by clicking on the little puzzle piece in the Chrome Browser and after that by clicking on the DuckDuckGo button. As you can see below, my website is rated with B+ which is pretty decent. My site is not rated for privacy. The reason for this is that DDG pulls the information from ToS:DR (Terms of Service: didn’t read) which means that the ToS are user-unfriendly (long and complicated). That database is far from complete so lots of websites are not in that database.

If you check out https://cnn.com you can see that there are trackers to other websites. If you click on their “trackers found” you can see an overview. Quite a lot of sites have these kinds of trackers and those sites are getting paid by the parties in those trackers (the advertisement parties):


Ghostery
This is one of my favorite plugins for privacy. Ghostery blocks ads and various trackers that gather information on you while you are surfing on the internet. If you click on the plugin you can see the main dashboard (I used CNN as an example again but these overviews are common for a lot of high traffic websites):

By clicking on the 3 vertical dots in the top right corner you can set up your preferences:

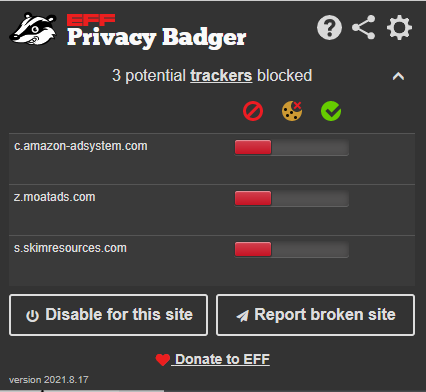
Privacy Badger
This is also a well-known blocking plugin. Like Ghostery, this plugin blocks all kinds of trackers that follow your activities while browsing the internet but it does it in a different way. You can compare it a bit with machine learning. The plugin learns from your browsing activity and if it detects the same tracker on three different websites, it starts blocking:
So it doesn’t rely on a database that is regularly updated. Because of this, the plugin doesn’t have to do a lot of cross-referencing with a database which means that it reduces resource consumption. You can run both plugins (Ghostery as well) but you don’t have to use them both because they are more or less the same (can’t hurt though in my opinion).
NoScript
For me, this is the no.1 privacy protection plugin tool that is around but it comes with a manual/learning curve. That is also the reason why I saved this plugin for last. NoScript is a plugin that blocks unnecessary and unwanted scripts on the pages that you are visiting. A script is a computer language (in most cases when you browse the internet it is Java) with a number of commands that automatically perform actions. This way you can become a victim of “evil” scripts that try to exploit you: for instance, dropping malicious software (malware) without getting a warning. The script gives an automatic command to deploy when you activate it by going on the site that then activates all scripts. This then triggers the “evil” script automatically as well, deploying the malicious software.
As said before, setting up NoScript can be a bit tricky because you might have the idea that NoScript breaks a website when you visit it while NoScript is on. This is because JavaScript is used for most of the websites you visit and disabling JavaScript with NoScript results in websites that fail to load. On a positive side note, this means that the plugin really works and you only have to set up a few things to make the website load with NoScript running.
To set NoScript up properly, you have to manually approve all websites you are visiting by consenting if you trust the scripts on them or not. Sometimes it only loads the site without, for instance, pictures. This happens when you go, for example, to Steam. To set up NoScript, you have to click on the puzzle piece of your browser and after that on the NoScript tag which you see in the below screenshot:

After you click a menu appears with the scripts that NoScript is blocking:

There are 4 buttons you can click:
- Temporary trust. This adds the script temporarily to your NoScript list as a trusted script. After you close your browser/internet session, it automatically resets and next time you have to activate the script again.
- Trust. This adds the script indefinitely to your NoScript list as a trusted script. When you close your browser/internet session and open it again, it is still marked as trusted and you don’t have to activate it again from the NoScript website. ”, button three is “not trust” (automatically blocks the script.
- Untrusted. This adds the script indefinitely to your NoScript list as a script you don’t trust and when you go to the website in the future, it will be automatically blocked for loading.
- Custom. With this option, NoScript unblocks specific individual elements on websites you visit. It allows you to unblock certain elements that are split in eight categories: script, object, media, frame, font, webgl, fetch and other. It looks like below screenshot:

In general, most users do not use this advanced and detailed feature. They prefer to rather block a full script or not. It’s a bit more tinkering/”cookie cutting” if you use this option. I personally only use options one until three and not this one. On the NoScript website, you can read about the features and the options in more detail as well.
After you have selected your preference, make sure to click on the green circle to add your selections to the list in NoScript. If you are not certain if a script is safe, you can check on Google. Most of the time the answer is over there.
Like I said: it can be a hassle and annoying but by using this plugin you are behind the steering wheel and you can make your own choices about what you want to allow and what you don’t want to allow. Personally, it’s a must-have for me to use this plugin to protect my privacy but it’s up to you of course.
Final thoughts
I hope these plugins will support you to protect your privacy more while browsing the internet. I use these 5 plugins all the time but I have more plugins I like. I will discuss them in a later post.
Feel free to ask me any questions or give me additional advice by contacting me. If you want to keep in the loop if I upload a new post, don’t forget to subscribe to receive a notification by e-mail.